Freshening up a garage
Taking you through a pandemic project of revitalizing a garage

Garage projects can be fun and rewarding. We keep our collector cars in a 40 by 72-ft. steel building. In one front corner is a walled-off space approximately the size of a two-car garage (about 23-1/2 by 23-2/3 ft.) with a radiant heating system. Over the years, a section of the heating system’s exhaust rotted away, allowing soot to collect in that corner and eventually on equipment the room.
We spotted the leak last winter and had it fixed, giving the heater a much-needed tune-up at the same time. We decided to redo the space when the warm weather came, not knowing that COVID-19 was coming, too. The pandemic cut our car show travel, so we saved money on hotels, restaurants and gas. That meant we had some money to spend fixing up the garage. Of course, we wanted to spend it as wisely as possible.
A photo of the shop taken in 2020 shows it when it was relatively clean and just starting to get cluttered with “good junk.” To redo the shop, we had to remove things that were sitting on the ground, including a wooden work bench, plus four rolling shelves loaded with MG parts, a parts washer, a welder, two battery chargers, several tool chests, hardware bins, two work carts, ladders, a large vise and other small items. To clean up sooty areas, it was also necessary to remove tin signs, model cars and a few other wall-mounted items.
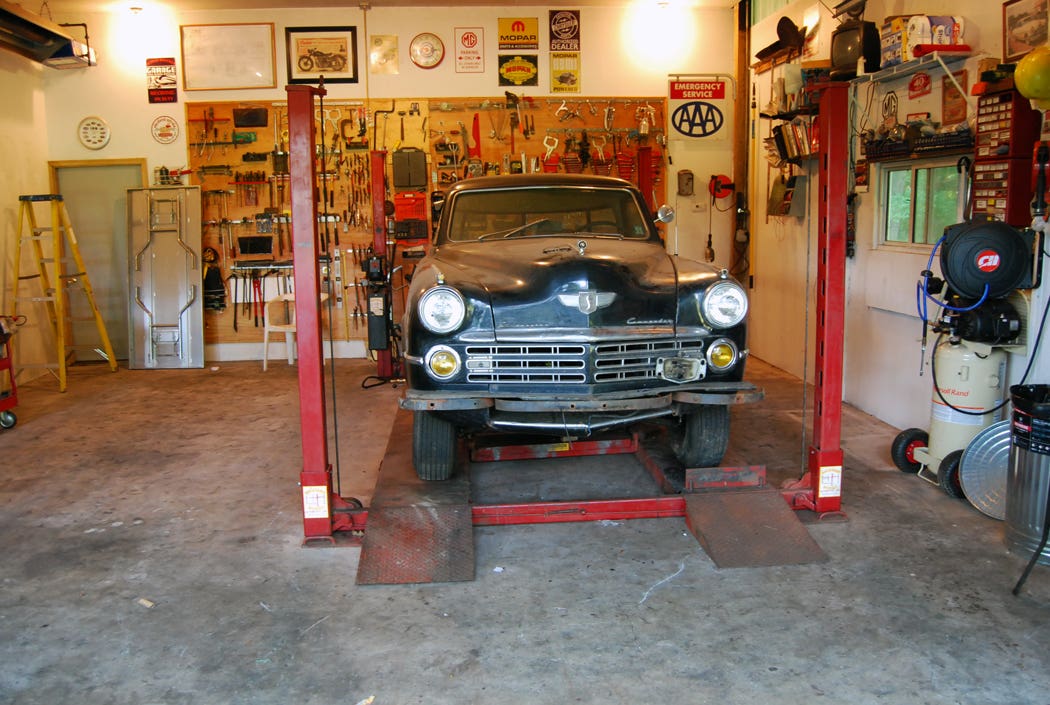
We moved all these items plus an under-restoration MG TF roadster into the unheated section of the building. Tools, air hoses and other things mounted on the cleaner areas of the wall were left in place, although some had to be painted around later. We progressed to the point where the only item on the floor of the “garage” section was a 1949 Studebaker Commander Starlight coupe sitting on a Backyard Buddy four-post lift.

The concrete floor of the garage was stained and dirty, so we decided to spruce it up. In 2010, we bought RaceDeck flooring (made by SnapLock Industries) for our Gunner’s Great Garage restoration shop. The black-and-white checkerboard floor made that shop really “pop,” so we called RaceDeck in Utah and talked to Shauna Cameron. Surprisingly, the price she gave us was the same as it was 10 years ago. We used graph paper to make a scale drawing of the room and figure out how many tiles we needed.
The cost of the flooring with taxes was $1630.63. Shauna said delivery would take a week, but two days later a semi-truck showed up and dropped off a pallet of cardboard cartons from SnapLock. We loaded the cartons into our Ford F-150 and drove them up the hill to our steel building and stored them until we were ready to install them.
Before installing the flooring, we painted the shop. The walls and ceiling would be white to brighten things up and make the room seem larger. We bought the paint at Walmart, then visited a nearby Sherwin Williams store to get help picking a primer that would cover the soot. It was even on sale. Since the shop has 14-ft. walls, we purchased a long, telescoping paint roller handle to paint the walls. We had planned to use texture paint on the ceiling, but it didn’t work well with a roller. So, we hired a man we used to work with who paints houses with his kids and puts the money into a college fund.
We were uncertain about installing the flooring, so we hired a pro to do it. We watched closely and realized we could have easily done it ourselves, but it would not have been trimmed as well. The install starts at one corner and moves across the room, then inward row-by-row. RaceDeck provides how-to-do-it illustrations on each box of tiles, as well as on a sheet inside each box. If your room doesn’t require trimming, it’s very easy.
It is necessary to leave a half-inch of expansion space along each wall and if you need to trim the tiles, an equal amount must be sliced off of each edge to keep the checkerboard pattern centered. A saber-saw was used to trim the tiles and our pro installer knew how to measure and cut quickly, so the whole job took one evening. If we had done it, it would look almost as nice, but would likely have taken several days.
The Backyard Buddy lift in the shop is the oldest one we own. While the newer ones are powder coated, this older lift is painted. After racing at Bonneville in 2013, we stored the race car on this lift. Although it had been washed twice, there was still enough salt on the car to rust the lift. Several attempts were made to paint it with store-bought paints, but none of those efforts came out well and we thought the lift would never look nice again.

Then we remembered meeting Randy Tomak of KBS Coatings at a car show. We called him and ordered the products needed for a three-step coating system designed to stop rust. He also recommended using KBS Maxx red top coat and paint activator to restore the lift’s final appearance. Randy looked a pictures of the lift and estimated how much of each product we needed. His estimate turned out to be exactly what we needed.
The KBS finishes were $260.70. Both Randy and the KBS technical department supplied instructions about the three-part coating system and both answered a large number of our questions.
We told Randy that we don’t spray paint in our small shop and he said it would be OK to apply the Maxx Red with a paint roller. The job went well and the lift came out looking great and rust protected. As the ramps move up and down, a little paint gets scraped off so we’ll have to do a some touch up until the posts kind of “sand” themselves.
After the new flooring was partly installed, we used a crow bar to move the lift over a completed section of flooring and center it in the room. The old wooden work bench we had was 33 in. deep and ate up a lot of space, but a slimmer new cabinet we planned to buy was 22 in. deep and would give us more work space on either side, plus tool storage.
We looked at rolling tool cabinets at big box stores and online, and they appeared to cost as much as $3600. The 62-in. Frontier cabinet we ultimately bought from Walmart was $656 with tax and free shipping to the local store. We picked it up with our F-150 and used the lift to unload it at home. The only assembly required was installing the casters.

We had a number of reproduction tin signs decorating the shop before, but we wanted to add more. New, high-quality reproduction porcelain signs can be purchased from Vintage Concepts “Signs,” LLC. Since we needed a large quantity of signs to fill for our space, we went with ordering additional tin signs, which are cheaper. These can be purchased at stores and swap meets for about $12-$15 each, but if you use the Desperate Enterprises website and order 15-29 signs, the price drops to $6 each with free shipping (and larger discounts for larger orders). We ordered 15 and although they only had 12 of them in stock, we still got the $6 apiece price.

Sources
RaceDeck Flooring
www.racedeck.com
KBS Coatings
www.kbs-coatings.com
Desperate Enterprises
www.desperate.com


*As an Amazon Associate, Old Cars earns from qualifying purchases.